SOTAbeams WOLFWAVE Advanced Audio Processor, model WOLF-100, is a powerful tool for demanding communications applications. Adaptive DSP noise reduction, audio band pass filtering and automated hearing loss correction are three of the simultaneous tasks this incredible device can accomplish. A rotary-encoder with push-to-set control accesses adjustments and simple menu system selections on the attractive OLED screen, which also provides a spectral display of the real-time audio passband.
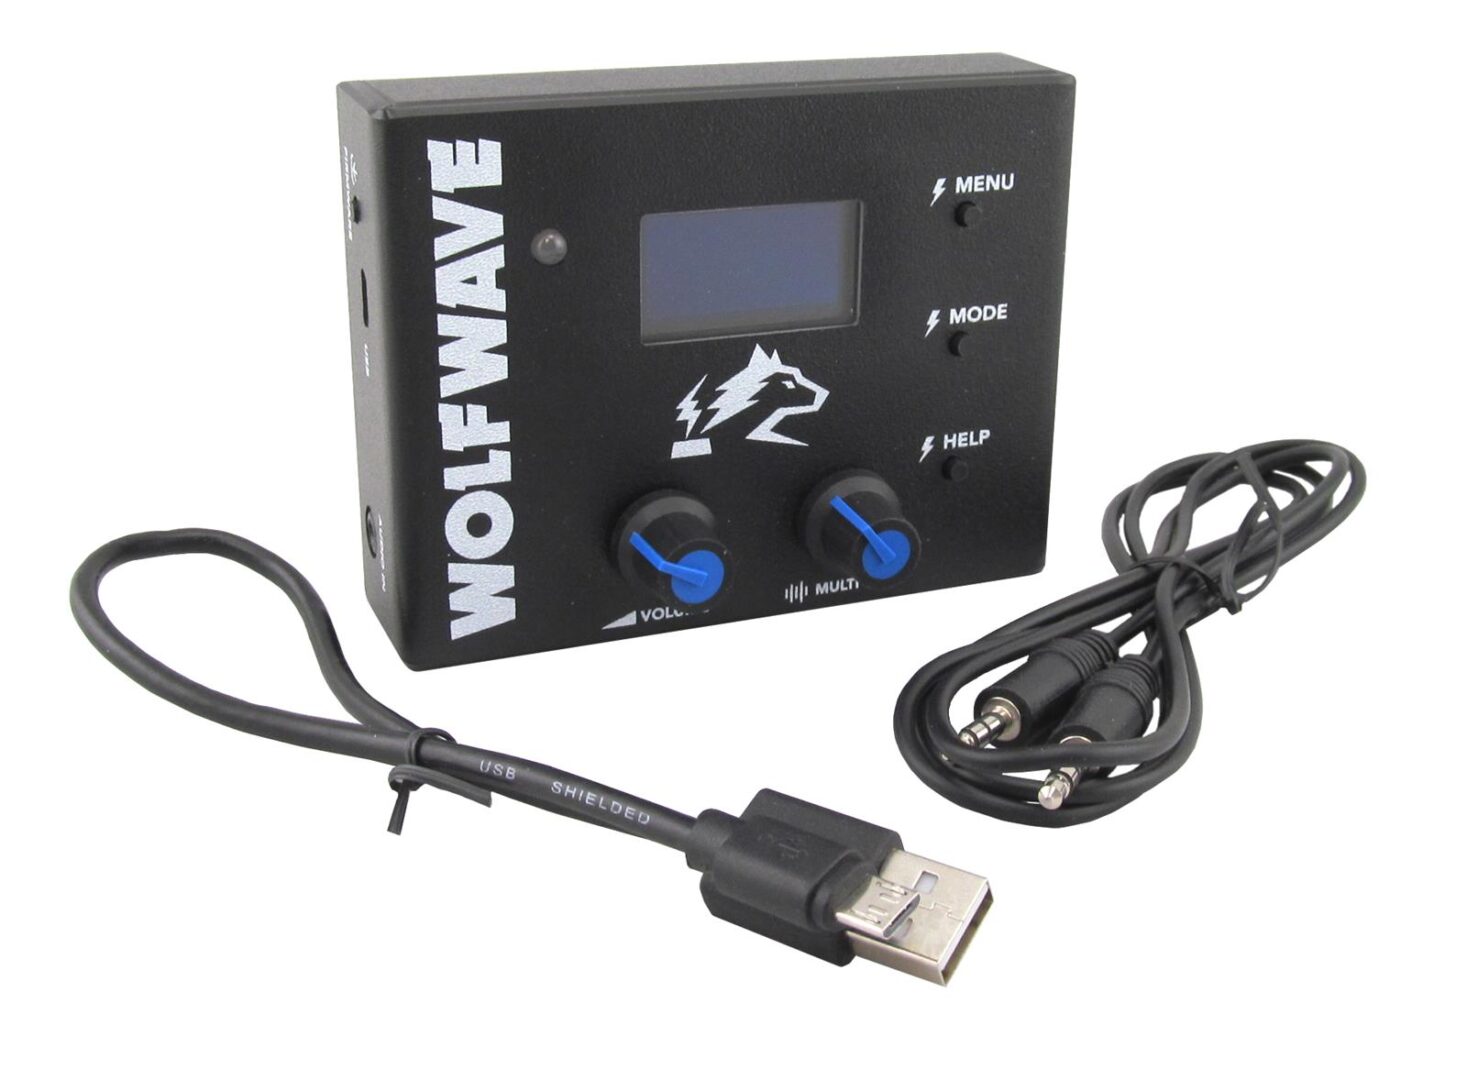
WOLFWAVE uses a high performance 32-bit ARM Cortex M7, the highest performance processor of the energy-efficient ARM M-series. This fantastic DSP processing power is paired up with a 20-bit CODEC (analog to digital – digital to analog conversion) and a 1.6 watt amplifier for superb audio performance. So easy to use and so amazing to hear, this in-line audio unit simply connects to the headphone jack of any radio. Connect your headphones or an external speaker to WOLFWAVE and transform your radio listening experience.
Here are some of the very useful, menu-selectable functions and features of WOLFWAVE:
-Fully adjustable audio band pass filtering from 50 Hz to 5 kHz – instantly adjustable for voice, data and CW
-Bright, clear, real-time audio spectrum display to see what’s happening in your radio passband
-State-of-the-art adaptive DSP noise reduction with 100 levels plus advanced control functions
-Adaptive DSP tone eliminator gets rid of annoying carriers, but leaves the CW
-Age-related hearing loss correction using ISO 7029:2017 median hearing-loss curves for males or females – menu selectable
-One-touch bypass function to instantly hear the comparison improvement by WOLFWAVE
-Memories to easily store and recall your favorite settings
-Audio test generator including two-tone test mode, sine, square and triangular wave
-Experimental CW regenerator to enjoy noise-free CW QSOs
-On-screen help and menu system that is so easy to use
-Tuning/Overload dual color LED indicator for easy tuning and input level adjustments
-User updatable firmware by USB to keep up with the latest WOLFWAVE developments
-Separate speaker and headphone outputs are excellent for exhibition stations
-Speaker output: 1.1 Watts @ 10% THD [speaker output must not be grounded
-Headphones operation supported with 5Vdc USB power from laptop or USB power pack
-Full output power for speaker operation achieved from 7 to 18 Vdc external input
-2.1 mm jack for DC power input (13.8 Vdc power supply sold separately)
-Low quiescent current drain of only 60 mA; battery-friendly!
-Small size (WHD) 4.13 x 3.15 x 1.06 in. (105 x 80 x 27 mm)
-Lightweight: 3.5 oz. (140 g)
-WOLFWAVE is supplied with one USB A to USB micro-B data power cable and one Audio patch cable with 3.5mm plugs
Bandpass Filtering
Adjusting the passband: When you power on your WOLFWAVE, the first screen will show the spectrum of the audio input. The horizontal line above the spectrum indicates the current passband.
The vertical dashed line indicates the centre of the passband, which is also the frequency used by signal detection for CW regeneration, and for the LED. The LED will light up green when a signal is detected near this frequency.
The text in the top right corner shows the current passband parameter being adjusted by the multi-use knob. Turn the knob to adjust the value.
A long press on the multi-use knob switches between centre+width and upper+lower edge adjustment modes. A short tap switches between the parameters in the current adjustment mode – so between centre and width, or between lower and upper edge.
The text below the spectrum indicates the horizontal range of the spectrum. This will automatically change to fit the upper edge of the passband.
The edges of the passband are limited to 100-5000 Hz, and the minimum bandwidth is 50 Hz.
Presets and Memory
Your WOLFWAVE has 4 presets to allow you to quickly change to one of the following passbands:
Voice wide: 300-2700 Hz
Voice narrow: 300-2400 Hz
CW/data wide: 300-1300 Hz
CW/data narrow: 450-750 Hz
These can be accessed through the menu, by going to “Bandpass filter > Load bandpass” and scrolling to the bottom. These 4 presets are constant and cannot be changed.
The WOLFWAVE also has 10 memory slots which you can use for saving and loading your own passband settings.
To save the current passband, go to “Bandpass filter > Save bandpass” in the menu and select a slot to save it in.
To load a saved passband, go to “Bandpass filter > Load bandpass” and select a slot. The lower and upper edges of the saved passband for each slot are displayed in the menu.
Enable/Disable Bandpass Filtering
Bandpass filtering can be enabled or disabled, by selecting the “Bandpass filtering > Bandpass filtering” menu item.
Disabling bandpass filtering is equivalent to setting it to the maximum range (100-5000 Hz).
Noise Reduction
Noise reduction will reduce the background noise. There will be an optimum setting depending on the type of noise that you are encountering. For example, there may be different requirements for SSB, AM or FM.
Noise reduction can be turned on or off by selecting “Noise reduction > Noise reduction” in the menu.
The noise reduction level can be adjusted with the “Noise reduction > Reduction level” item in the menu. Larger values will reduce the noise more, but values that are too large will distort the signal and make it harder to understand (since some of the signal will be classified as noise and removed). A value of around 50-65 is often a good starting point. Values much above 80 are likely to distort speech too much, but may be useful for CW.
CW Regenerator
The CW regenerator is an experimental function that we are actively developing, which works on the CW (Morse) signal in the centre of the passband. It detects the dots and dashes and regenerates the CW with a clean sine-wave.
The detection frequency is the same as the centre frequency of the bandpass filter. So to change that frequency, change the centre frequency of the bandpass filter.
The following parameters are adjustable in the “CW regen” submenu:
Toggle CW regenerator on or off.
Detection threshold. If noise is being falsely detected as a signal, increase this to make detection less sensitive.
Output frequency can be set to either a user defined constant value, or to follow the detection frequency.
Output volume. Turning the volume knob still affects the volume, this setting acts in combination with it. This allows the volume of the regenerated tone to be adjusted to be close to the original audio, to avoid sudden changes in volume when toggling CW regeneration.
Toggle split stereo mode, where the regenerated signal is sent to the left headphone output and to the speaker, and the original signal to the right headphone output
Hearing Loss Compensation
The age-related hearing loss compensation function applies a frequency dependent gain, based on median hearing thresholds published by the International Standards Organisation (ISO 7029). This boosts the higher audio frequencies that become more difficult to hear with age.
The compensation will not be perfectly accurate, because these are median values instead of tailored specifically to the listener, and because of non-linearities in human hearing, but should be a useful first approximation.
To use this, go to the “Hearing loss comp” submenu to set your age and gender and to toggle this feature on or off.
If you use a hearing aid, this should already apply the relevant compensation and so the WOLFWAVE hearing loss feature should not be required.
Audio Signal Generator
WOLFWAVE incorporates a handy low-distortion audio signal generator, which can be accessed through “Utilities > Generate tone” in the menu. The signal is generated for as long as the “Generate tone” screen is displayed. To exit back to the menu and stop the signal generator, press the menu button.
Available signal shapes are sine, square, triangular, and two tone.
All signals have adjustable frequency (100-5000 Hz) and amplitude.
Two tone mode generates two simultaneous sine waves added together, which can be used for transmitter testing. The adjustable parameters are frequency and amplitude of one of the tones, and frequency and amplitude of the other tone relative to the first one.
Connections
Input:
Connect an audio input to your WOLFWAVE (left hand side) using the supplied cable. Typically, this will be the headphone output of your radio.
In some circumstances, such as powering your WOLFWAVE and radio from the same DC supply, a line-isolator may be required in series with the audio input lead.
Output:
Connect a loudspeaker or headphones to the connectors on the right hand side. You can connect one or both.
NOTE: the speaker connections must not be grounded as WOLFWAVE uses a high-efficiency Class D audio amplifier, the output of which is not centred on ground.
Power:
Your WOLFWAVE can be powered in two ways; via USB or via a DC supply. We supply a USB lead which can be used to get you going. Any clean USB supply will work.
For best quality audio output, we recommend using a DC supply of at least 7V via the 2.1mm DC connector on the right hand side of your WOLFWAVE.
This will allow a larger maximum speaker output power than if your WOLFWAVE is powered by USB.
DC supply voltage range: 5.5 – 18V.
Use at least 7V for maximum speaker output power.
The headphones output should work equally well with USB, or with any DC voltage in the range 5.5 – 18V.
Controls
Volume control:
Standard volume control, turn clockwise to increase the volume.
Multi use control:
When in the menu, pressing it activates or deactivates the currently selected menu item.
When in the main spectrum display, pressing it switches between passband parameters.
Turning it is used to either scroll, or to adjust the currently selected value.
Menu button:
Enter or leave the menu.
Mode button:
When in the menu, activates or deactivates the currently selected menu item (same as pressing the multi use knob).
When in the main spectrum display, reserved for future use.
Help button:
Short tap: shows or exits context-sensitive help.
Long press: toggles the bypass function.
LED:
The LED will light up green if a signal is detected near the center of the passband.
Basic Usage
Menu
The WOLFWAVE has a number of options and advanced features accessible through the menu system.
To show or hide the menu, press the menu button. Turn the multi-use control to scroll through menu options. A short press of the multi-use control or of the mode button selects the option.
Most settings are edited directly in the menu. After selecting a menu item, turn the multi-use control to adjust it, then press multi-use or mode again to deselect it.
All changes to settings will only last until your WOLFWAVE is next turned off and on again, unless you specifically save the current settings as the new power on defaults using “Other settings > Save defaults”.
Settings can be reset to factory default values by using “Other settings > Factory reset all” to reset all settings. Or use the “Factory reset” item available in some of the submenus, such as noise reduction and CW regeneration, to only reset the values in that submenu.
As with other changes made to settings, the reset values will only last until your WOLFWAVE is next turned off and on again, unless you specifically save them.
Firmware
Once your WOLFWAVE boots up, the first thing that you will want to do is to check that you have the latest firmware running. WOLFWAVE firmware is regularly updated to add new features and to fix bugs. These instructions will always relate to the latest firmware version.
To check the firmware version on your WOLFWAVE, navigate in the menu to “Utilities > Firmware version”.
Then go to www.wolfwave.co.uk/firmware to find the latest version and for instructions on how to load and install it.
Spectrum Display
When you power on your WOLFWAVE, the first screen will show the audio spectrum.
The text below the spectrum indicates the horizontal range of the spectrum. This will automatically change to fit the upper edge of the passband.
The horizontal line above the spectrum indicates the current passband of the bandpass filter.
The vertical dashed line indicates the centre of the passband, which is also the frequency used by signal detection for CW regeneration, and for the LED. The LED will light up green when a signal is detected near this frequency.
The text in the top right corner shows the current passband parameter being adjusted by the multi-use knob. Turn the knob to adjust the value.
A long press on the multi-use knob switches between centre+width and upper+lower edge adjustment modes. A short tap switches between the parameters in the current adjustment mode – so between centre and width, or between lower and upper edge.
The vertical range of the spectrum can be adjusted to fit the input signal more closely by going to “Other settings > Spectrum range” in the menu.
Bypass
To help you hear the effects of the filtering, the WOLFWAVE has a bypass function. This can be toggled either in the menu, or with the help button.
A long press on the help button bypasses the WOLFWAVE, and another long press re-engages the WOLFWAVE.
When bypassed, no digital filtering is performed, the only change made to the audio data is to amplify or attenuate it based on the volume control.
When the Bypass function is engaged it is indicated by a flashing “Byp” indicator in the lower left corner of the screen.